These How-To's are written and illustrated step-by-step. Click
on the underlined topic to view the instructions. Click the paint
brush container to view the illustrated instruction. The illustration
will open in separate window.
|
 |
| Basic Operations |
|
|
Topic
|
Written Instruction
|
Illustrated Instruction
|
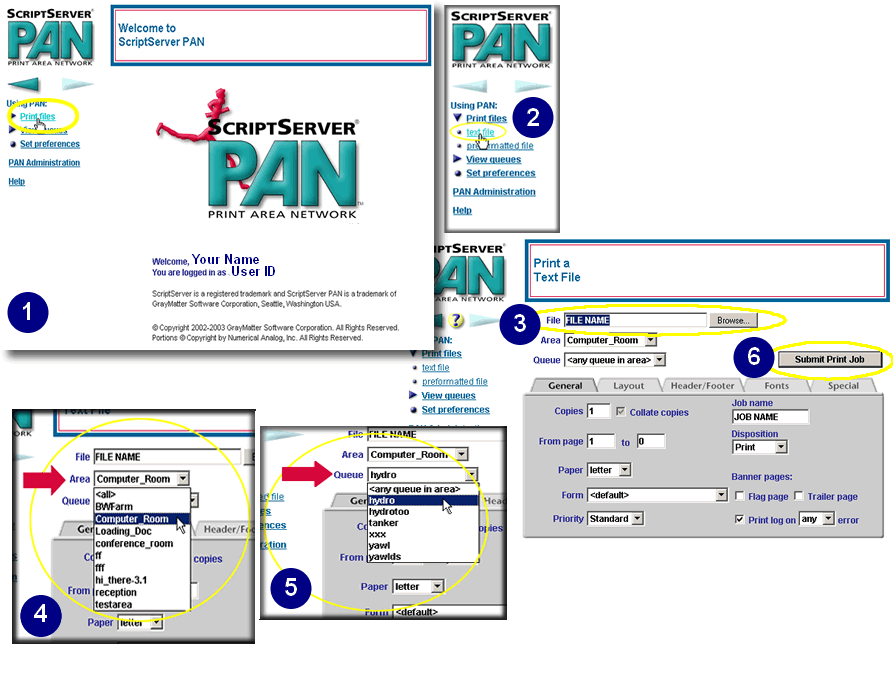
| Print a Text File |
| |
To print a text file
- From the welcome screen, click Print files.
- Click text file. The Print a Text File screen
appears.
- Either type the name of the file you wish to print or click
Browse to select a file.
- Select an area from the Area box that contains the queue
that you will select for the print job. The default is <all>.
- Select a queue name from the Queue box. The available
queues in this box depend on the selection of the area.
- You can now either click Submit Job Print or select various
options before printing using any or all of the five tabs.
|

|
| Print a Preformatted File |
| |
To print a preformatted file
- From the welcome screen, click Print files.
- Click preformatted file. The Print a Preformatted
File screen appears.
- Either type the name of the file you wish to print or click
Browse to select a file.
- Select an area from the Area box that contains the queue
that you will select for the print job. The default is <all>.
- Select a queue name from the Queue box. The available
queues in this box depend on the selection of the area.
- Select a data type from the Data type box that contains
the type of file to be selected. The default value is <auto>.
- You can now either click Submit Job Print or select various
options before printing using either or both of the two tabs.
|
|
| View Jobs |
| |
To view jobs
- From the welcome screen, click view queues.
- Click view jobs. The Summary Listing of Print Jobs
screen appears.
- Select an area from the Area box that contains the queue
that you will select for the print job. The default is <all>.
- Select a queue name from the Queue box. The available
queues in this box depend on the selection of the area.
- If you wish to view queues that are contained in areas, select
show area queues.
- If you wish to see full details in the summary, select detailed
listing
- If you wish to change the update frequency, type a value in
the Update frequency box.
- Click Update. The summary screen will appear.
|
|
| Monitor Queues |
| |
To monitor queues
- From the welcome screen, click view queues.
- Click monitor queues. The Monitor queues screen
appears. Use the Left and Right Arrow keys at the bottom of the
screen to see the previous or next screen respectively.
|
|
| Set User Preferences
|
| |
To set preferences
- From the welcome screen, click Set preferences. The Set
User Preferences screen appears.
- Enter information for all required boxes for user information.
- Enter any other information for optional boxes for user
information, user preferences, and passwords.
- Click Saveto save your selections. The Preferences
were saved… Re-initializing message appears. To cancel
the operation, click Cancel. The Preferences were not
saved message appears.
|
|
|
PAN Administration
|
| Create a Queue
|
| |
To create a queue
- From the welcome screen, click PAN Administration.
- Click Manage queues.
- Click Create queue. The Create a New Queue screen
appears.
- In the Explorer User Prompt box, type the name of the
new queue. All print queues are global and have a unique name.
While each queue must reside on a host, the specific host is not
referenced during print job submission. One or more queues can
share a printer.
- Click OK. The name of the queue appears in the Queue
box
- If you wish to clone this new queue from an existing queue,
select the queue name from the Clone from queue box. The
new queue receives all of the characteristics, except the name,
of the selected queue. The default value is <none>.
- Under the Properties tab, type the TCP/IP address in
the IP address box.
- You can either click OK now to create the queue using
the defaults or you can select other options using the five tabs
and click OK when you are finished. If PAN successfully
creates the new queue, the Operation was successful message
appears.
|
|
| Create an Area |
| |
To create an area
- From the welcome screen, click PAN Administration.
- Click Manage areas.
- Click Create area. The Create a New Area screen
appears.
- In the Explorer User Prompt box, type the name of the new area.
- Click OK. The name of the area appears in the Area
box. The host name appears in the On host box. A host is
a system that receives and processes print requests for a queue
or an area. A host can be a manager of one or more areas and queues.
All queues belonging to an area reside on the same host.
- To modify the host, click Modify host.
- If desired, type a description of the area in the Description
box.
- You can either click OK now to create the area using
the defaults or you can select other options and click OK
when you are finished. If PAN successfully creates the new area,
the Operation was successful message appears.
|
|
| Configure Printing on a Host |
| |
To configure printing on a host
- Select a host in the Host box.
- Type the TCP/IP address for the host in the IP address
box.
- Set the initial state of the host to enabled or disabled
in the Initial state box. The default value is enabled.
- Set the current state of the host to enabled or disabled
in the Current state box. The default value is enabled.
- If there is to be an LPD gateway on this host, select the enable
LPD gateway on this host box. An LPD Gateway is software that
enables non-PAN clients to access PAN queues as an LPR client.
- If the enable LPD gateway on this host box is selected,
and flag pages are desired, select the enable flag pages on
LPD gateway jobs box.
- If the enable LPD gateway on this host box is selected,
and trailer pages are desired, select the enable trailer pages
on LPD gateway jobs box.
- Click OK. If PAN successfully modifies the host, the
Operation was successful message appears.
|
|
| Create a Form |
| |
To create a form
- From the welcome screen, click PAN Administration.
- Click Manage forms.
- Click Create form. The Create a New Form screen
appears.
- In the Explorer User Prompt box, type the name of the
new form.
- Click OK. The name of the form appears in the Form
box.
- If desired, type a description of the form in the Description
box.
- Select a Resource Type from the Resource Type box. Resources
are grouped by resource type.
- Select a resource from the Resource box. Resources are
characteristics that define the appearance and physical handling
of a print job. A resource is a global identifier established
by the system administrator. This identifier designates either
an attribute of a print job or a capability of a queue. The selection
of Resource Type determines the available resources in
the Resource box. More than one resource can be added to
a form. Click Add to form for each resource that is to
be added to the selected form. The selected resource appears in
the table at the bottom of the screen, in the order that PAN processes
it. Click the Up or Down button to change the order of the selected
resources.
- You can either click the OK button now to create the
form using the defaults or you can select other options and click
OK when you are finished. If PAN successfully creates the
new form, the Operation was successful message appears.
|
|
| Create a Department |
| |
To create
a department
- From the welcome screen, click PAN Administration.
- Click Departments.
- Click Create department. The Create a New Department
screen appears.
- In the Explorer User Prompt box, type the name of the
new department. PAN’s only restrictions on the department
name are:
- Spaces are not allowed.
- When creating a department name, you may want to consider
the ramifications of the name you select. For a discussion
on this topic, see “Concepts: Naming”
- Click OK. The name of the form appears in the Department
box.
- If desired, type the name of the department head in the Department
Head box.
- If desired, type the name of the cost center in the Cost
Center box.
- Click OK now to create the department. If PAN successfully
creates the new form, the Operation was successful message
appears. To check your work, go to the department listing menu
item. If changes need to be made, you can either go to the department
modification menu item or click on the appropriate Mod.
button at the right end of the record needing changes.
|
|
| Create a New Resource Set |
| |
To create a new resource set
- From the welcome screen, click PAN Administration.
- Click Resources.
- Click Create set. The Create a New Resource Set
screen appears.
- Type the name of the new resource set in the New shared resource
set name box.
- If desired, type a description of the area in the Description
box.
- Click OK to create the new resource set. If PAN successfully
creates the new resource set, the Operation was successful
message appears.
|
|
| Create a New Resource |
| |
To create a new resource
- From the welcome screen, click PAN Administration.
- Click Resources.
- Click Create resource. The Create a New Resource
screen appears.
- In the Explorer User Prompt box, type the name of the
new resource.
- Click OK. The name of the resource appears in the Resource
name box.
- If desired, select the resource set you want to clone from in
the clone from set box. The default value is [global]global.
- If desired, select the resource you want to clone from in the
clone resource box. The default value is <none>.
- Select the resource set in the Resource set box.
- If desired, type a description of the resource in the Description
box.
- You can either click Save now to create the resource
using the defaults or you can select other options in the five
tabs and click Save when you are finished. If PAN successfully
creates the new resource, the Operation was successful message
appears.
Note: Create Resource does not create image,
file, or font resources. To create an image resource, use Upload
Form Image. To create a file or font resource, use Upload
File Resource.
|
|
| Summary Listing of Resources |
| |
To display the summary listing of resources
- From the welcome screen, click PAN Administration.
- Click resource listing.
- Click Create resource. The Summary listing of Resources
screen appears.
- Select any desired resource set in the Resource set box.
The default value is [global]global.
- Click the appropriate Mod. button to modify a resource.
|
|
| Upload a Soft Form Image File |
| |
To upload an image file
- From the welcome screen, click PAN Administration.
- Click Resources.
- Click Upload form image. The Upload SoftForm Image
File screen appears.
- In the Explorer User Prompt box, type the name of the
new SoftForm image resource name.
- Click OK. The name of the resource appears in the Resource
name box.
- If desired, select the resource set you want to clone from in
the Resource set box. The default value is [global]global.
- If desired, type a description of the resource in the Description
box.
- Type the name of the encapsulated Postscript file to upload
in the Encapsulated Postscript file to upload box. You
can click Browse to search for files.
- You can either click Upload now to create the resource
using the defaults or you can select other options and click Upload
when you are finished. If PAN successfully creates the new resource,
the Operation was successful message appears
|
|
| Upload a File Resource |
| |
To upload file resource
- From the welcome screen, click PAN Administration.
- Click Resources.
- Click Upload form image. The Upload SoftForm Image
File screen appears.
- In the Explorer User Prompt box, type the name of the
new SoftForm image resource name.
- Click OK. The name of the resource appears in the Resource
name box.
- If desired, select the resource set you want to clone from in
the Resource set box. The default value is [global]global.
- If desired, type a description of the resource in the Description
box.
- Type the name of the encapsulated Postscript file to upload
in the Encapsulated Postscript file to upload box. You
can click Browse to search for files.
- You can either click Upload now to create the resource
using the defaults or you can select other options and click Upload
when you are finished. If PAN successfully creates the new resource,
the Operation was successful message appears.
|
|
| Upload PPD data |
| |
To upload PPD Data
- From the welcome screen, click PAN Administration.
- Click Utilities.
- Click Download.
- Download the appropriate ScriptServer PAN Resource Builder
and run it.
- Choose Open PPD... from the File menu.
- Locate and open a PPD file (the location and naming convention
for these varies).
- Check the desired items in the Printer Options window.
Each item will become a separate resource.
- Choose Upload To Resource Set... from the File
menu.
- Enter the URL of a PAN server, along with either the operator
or administrator passwords.
- Click the New... button on the resulting Select Resource
Set window.
- Enter the name of a new resource set.
- Click OK. The checked items will be uploaded; each will
become a separate resource.
|
|